As a supplier of walk – behind rollers, I understand that proper maintenance is crucial for the longevity and optimal performance of these machines. One of the most fundamental maintenance tasks is changing the oil. In this blog post, I’ll guide you through the process of how to change the oil in a walk – behind roller, step by step. Walk-behind Roller
Why Oil Changes are Important
Before diving into the process, it’s essential to understand why regular oil changes are vital for your walk – behind roller. The engine oil in a walk – behind roller serves several key functions. First, it lubricates the engine’s moving parts, reducing friction and wear. This helps prevent premature damage to components such as pistons, bearings, and valves. Second, the oil acts as a coolant, dissipating heat generated by the engine. Third, it helps to clean the engine by suspending and carrying away dirt, debris, and combustion by – products. Over time, the oil breaks down and becomes contaminated, losing its effectiveness. If you don’t change the oil regularly, it can lead to reduced engine performance, increased fuel consumption, and even engine failure.
Tools and Materials You’ll Need
- Oil drain pan: Make sure it’s large enough to hold all the old oil from the roller’s engine. A capacity of at least 2 – 3 quarts is usually sufficient.
- Socket or wrench set: You’ll need the appropriate size to remove the oil drain plug and the oil filter. Check your roller’s manual for the correct sizes.
- Funnel: To help pour the new oil into the engine without spilling.
- New oil filter: Always use a filter that is recommended for your specific walk – behind roller model.
- New engine oil: Refer to the owner’s manual for the correct type and quantity of oil. The viscosity and quality of the oil are important factors for proper engine operation.
- Safety gloves and goggles: Protect your hands and eyes from hot oil and any potential debris.
- Rag or paper towels: For cleaning up any spills and wiping down components.
Step 1: Prepare the Roller
- Park the walk – behind roller on a level surface. This ensures that the oil drains completely and accurately from the engine. If the roller is on an incline, some of the old oil may remain in the engine, which can contaminate the new oil.
- Let the engine cool down. Hot oil can cause severe burns. Wait at least 15 – 20 minutes after turning off the engine to allow it to reach a safe temperature.
- Gather all the necessary tools and materials and place them within easy reach.
Step 2: Locate the Oil Drain Plug and Filter
- Consult the owner’s manual to find the exact location of the oil drain plug and the oil filter on your walk – behind roller. In most cases, the oil drain plug is at the bottom of the engine oil pan, and the oil filter is mounted near the engine.
- Once you’ve located them, put on your safety gloves and goggles.
Step 3: Drain the Old Oil
- Position the oil drain pan directly beneath the oil drain plug.
- Use the appropriate socket or wrench to loosen the oil drain plug. Turn it counter – clockwise. Be careful as the oil may start to flow immediately.
- Once the plug is loose, carefully remove it by hand. Allow all the old oil to drain into the pan. This may take several minutes. You can gently tap the side of the engine oil pan to help the oil flow more quickly.
- While the oil is draining, inspect the drain plug for any signs of damage or metal shavings. Metal shavings can indicate internal engine wear, and if you find a significant amount, it’s a good idea to have a professional mechanic check the engine.
Step 4: Replace the Oil Filter
- Locate the oil filter. It’s usually a cylindrical part. You may need to use an oil filter wrench to loosen it. Turn the filter counter – clockwise.
- Once it’s loose, remove the old oil filter by hand. Be prepared for some oil to drip from the filter and the mounting area.
- Before installing the new oil filter, apply a thin layer of new engine oil to the rubber gasket on the top of the filter. This will help create a good seal and prevent leaks.
- Screw the new oil filter onto the mounting area by hand. Make sure it’s tightened securely, but don’t over – tighten it. Over – tightening can damage the filter and the mounting area.
Step 5: Refill with New Oil
- Take the funnel and insert it into the oil fill opening. The location of the oil fill opening is also specified in the owner’s manual.
- Slowly pour the new engine oil into the funnel. Refer to the manual for the correct oil capacity. It’s better to add the oil in small increments and check the oil level frequently using the dipstick.
- After adding a portion of the oil, remove the dipstick, wipe it clean with a rag, re – insert it fully, and then remove it again to check the oil level. The oil level should be between the "min" and "max" marks on the dipstick.
- Continue adding oil until the level reaches the appropriate mark.
Step 6: Check for Leaks and Clean Up
- Once you’ve filled the engine with the correct amount of oil, replace the oil fill cap tightly.
- Start the engine and let it run for a few minutes. This allows the oil to circulate throughout the engine.
- While the engine is running, check around the oil drain plug and the oil filter for any signs of leaks. If you notice a leak, turn off the engine immediately and tighten the affected component as needed.
- After checking for leaks, turn off the engine.
- Use a rag or paper towels to clean up any spilled oil. Dispose of the old oil and the used oil filter properly. Many auto parts stores and service centers accept used oil for recycling.
Tips for a Successful Oil Change
- Always follow the manufacturer’s recommendations in the owner’s manual. Different walk – behind roller models may have specific requirements for oil type, change intervals, and procedures.
- If you’re unsure about any step of the process, it’s better to consult a professional mechanic or contact our technical support team.
- Keep a record of your oil changes, including the date, the type of oil used, and the mileage or hours of operation on the roller. This can help you stay on top of your maintenance schedule.
Conclusion
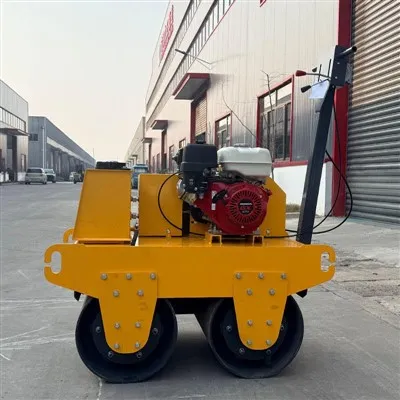
Changing the oil in a walk – behind roller is a relatively straightforward process that can significantly extend the life of your machine. By following the steps outlined in this blog post and using the right tools and materials, you can ensure that your walk – behind roller operates at its best.
Electric Forklift As a trusted supplier of walk – behind rollers, we are committed to providing high – quality products and excellent after – sales support. If you have any questions about oil changes or any other maintenance issues, or if you’re interested in purchasing a new walk – behind roller, please don’t hesitate to contact us. We’re here to help you make the right choice and ensure that your equipment performs optimally for years to come.
References
- Manufacturer’s Owner’s Manuals for Walk – Behind Rollers
- Automotive Maintenance Handbooks
Jining Sunsail Machinery Co., Ltd.
With abundant experience, we are one of the most professional walk-behind roller manufacturers and suppliers in China. We warmly welcome you to buy high-grade walk-behind roller made in China here from our factory. For price consultation, contact us.
Address: Room 410, Digital Industry Building, Rencheng District, Jining City, Shandong Province,China
E-mail: Sunsail_machinery@163.com
WebSite: https://www.sunsailmachine.com/
